Adjusting Sharp Printer Tray Settings Without Losing Your Mind

May 12, 2025
 0 views
 0 comments
How to change printer tray settings sharp in 4 simple steps:
- Press the [CUSTOM SETTINGS] key on the control panel
- Touch the [TRAY SETTINGS] key
- Select the tray number you want to configure
- Choose the correct paper type and size, then press [OK]
Have you ever loaded fresh paper into your Sharp printer, only to be greeted with an annoying jam or a cryptic error message? You’re definitely not alone. I’ve seen this scenario play out in offices countless times, and it usually comes down to one simple thing: the printer doesn’t know what paper you’ve actually loaded.
Think of it like trying to wear shoes that are two sizes too small—something just isn’t going to work right! When your Sharp printer’s settings don’t match the paper in the tray, it’s a recipe for frustration. The good news? Fixing this is much easier than you might think.
For office managers juggling a million tasks, printer issues can quickly derail productivity. Nothing brings work to a standstill quite like the dreaded “paper mismatch” error when you’re rushing to print an important presentation.
Why proper tray settings matter:
Properly configured trays do more than just prevent those annoying paper jams. They ensure your print quality remains consistent by applying the right amount of toner and heat for different paper types. They also enable your printer to automatically switch between trays during large jobs, keeping your workflow smooth and uninterrupted.
Here’s an important fact we found that explains a lot of confusion: On several Sharp MX models, including the popular MX-3100N, Trays 1 and 2 do NOT have auto size sensing. This means the printer can’t automatically detect what paper size you’ve loaded—you must tell it manually through the system settings. Mystery solved for why those trays sometimes seem to ignore the paper you’ve loaded!

When you’re dealing with special media like envelopes, labels, or heavier cardstock, proper tray configuration becomes even more critical. These materials need specific heat and pressure settings to prevent wrinkling, smudging, or jamming—all of which are controlled through your tray settings.
If you’re looking to expand your Sharp printer knowledge, we’ve got you covered with guides on related topics like how to print double sided on sharp printer, how to add sharp printer to pc, and how to install sharp printer driver on windows 10.
With just a few moments spent on proper configuration, you’ll save yourself hours of troubleshooting and frustration down the road. Your Sharp printer is a sophisticated piece of technology—it just needs the right instructions to perform at its best!
How to Change Printer Tray Settings Sharp: Quick Overview
Getting your Sharp printer to play nicely with paper starts with one simple button: the CUSTOM SETTINGS button on your control panel. This magical little button is your gateway to the TRAY SETTINGS screen where all the paper magic happens.
How to change printer tray settings sharp is really about teaching your printer to understand what kind of paper you’ve loaded. Think of it as introducing your printer to its dinner – it needs to know what it’s being fed! Every tray needs two essential pieces of information:
- Paper Size: Is it Letter, Legal, A4, or something else?
- Paper Type: Plain paper, recycled, letterhead, or heavy stock?
When these settings don’t match what’s actually in the tray, your printer gets confused – resulting in paper jams, weird-looking prints, or those annoying error messages we all dread.
Here’s how factory settings compare to your custom options:
| Setting Type | Factory Default | Custom Option Benefits |
|---|---|---|
| Paper Size | Letter (US) or A4 (Europe) | Supports special sizes like legal documents or envelopes |
| Paper Type | Plain Paper | Adjusts fusing temperature for specialty media |
| Tray Switching | Disabled | Enables continuous printing when one tray empties |
| Duplex Printing | Enabled for compatible paper | Can be disabled for special stock |
| Custom Sizes | Not registered | Up to 7 custom sizes can be saved for the bypass tray |
Did you know your Sharp printer can remember up to 1,000 different paper profiles? That’s like having a paper sommelier inside your printer, ready to handle everything from everyday copy paper to fancy cardstock!
Accessing the Tray Settings Menu
Your Sharp printer offers several paths to paper perfection:
Method 1: Direct from the Operation Panel Touch the [Tray Settings] key right on your home screen. You’ll see all your trays and their current settings at a glance. Just tap [Change] next to any tray you want to modify.
Method 2: Through System Settings (Administrator Mode) Press the [CUSTOM SETTINGS] button, then touch [USER CONTROL] or [SYSTEM SETTINGS] (depending on your model). Next, select [PAPER TRAY SETTINGS] or [TRAY SETTINGS] and choose which tray needs attention.
Method 3: The Automatic Bypass Prompt Some Sharp models are extra helpful – they’ll automatically ask you about paper settings when they notice you’ve loaded paper in the bypass tray. It’s like your printer saying, “Hey, I see you’ve got new paper there… what is it exactly?”

For some settings, you might need administrator rights. If you hit a wall with “Access Denied,” you’ll need to track down your system administrator (who’s probably enjoying coffee somewhere while you wrestle with the printer).
When Tray Settings Cannot Be Changed
Sometimes your Sharp printer just isn’t in the mood to change. Here’s when you’ll need to wait:
During a paper-out condition, your printer is essentially saying, “I’m hungry! Feed me paper first, then we’ll talk settings.” Load paper before trying to change anything.
If you’ve got a paper jam (or misfeed state), your printer needs that resolved before it can think about new settings. Clear the jam completely first.
When someone has initiated an interrupt copy job, you’re in the digital equivalent of “please take a number and wait.” Once that job finishes, you can make your changes.
During active print or fax jobs, your printer is busy and can’t be disturbed. It’s like trying to change someone’s shoes while they’re running – just wait until the job completes.
As Anthony Washington from Knight Office Solutions wisely notes, “Always make sure your printer isn’t in an error state before attempting to change tray settings. The menu options won’t be available until the printer returns to a ready state.”
If you find yourself locked out of the settings, take a deep breath, fix whatever is making your printer unhappy, and then try again. Your Sharp printer will be much more cooperative once it’s feeling better!
Step-by-Step: Setting Paper Size and Type per Tray
Let’s walk through exactly how to set up each paper tray on your Sharp printer. Trust me, once you’ve done this a few times, it becomes second nature!
- Load paper into the tray properly, making sure the guides snugly fit against the paper edges (not too tight, not too loose—think Goldilocks).
- Press the [CUSTOM SETTINGS] key on your control panel. This is your gateway to all printer customizations.
- Touch the [TRAY SETTINGS] key to see all your trays at a glance.
- Select the tray number you want to configure. Whether it’s Tray 1 for your everyday paper or the Bypass Tray for that special cardstock, tap the one you need.
- Choose the correct paper type from the menu. Your Sharp printer needs to know what it’s working with to adjust temperature and handling:Plain paper works for most everyday documents, while Heavy Paper settings adjust the fuser temperature to prevent smudging. If you’re printing letterhead, select that option so the printer knows which side should face up.
- Select the paper size that matches what you’ve loaded:The usual suspects are all here—Letter, Legal, A4, and more. How to change printer tray settings Sharp involves matching what’s in the tray with what you tell the printer is there.
- Press [OK] to save your selection.
- Confirm your choice when prompted with another quick tap of [OK].
It’s worth noting that Sharp printers have some quirky restrictions. For instance, some models only allow A5 size in tray 1, and B5 size might not work in tray 2 (though B5R will). These little details can save you a lot of head-scratching when a particular size won’t register.

Registering Custom Paper Sizes in the Bypass Tray
Here’s where Sharp printers really shine—custom paper sizes for those non-standard projects that come your way.
To set up a custom size (perfect for those oddly-sized marketing materials or specialty envelopes):
Access Tray Settings and select the Bypass Tray. Then tap one of the Custom slots (numbered 1-7). Sharp thoughtfully gives you seven memory slots for different custom sizes.
Choose your measurement system (Size Input-AB for metric or Size Input-Inch for imperial), then enter the paper dimensions. For the bypass tray, you can typically use anything from postcard-sized papers (about 3.625″ × 5.5″) up to poster-sized sheets (12″ × 18″).
A quick tap of [OK] saves your custom size for future use. Now you won’t have to remember that your company’s custom letterhead is exactly 8.25″ × 10.75″—the printer remembers for you!
As one of our clients mentioned after we set this up for them: “I used to dread printing our custom brochures, but now I just select Custom 3 and it works perfectly every time!”
Creating a New Paper Type Profile
For those specialty papers that need extra TLC, Sharp allows you to create custom paper profiles with precise handling instructions.
Steer to System Settings → Tray Settings/Paper Settings → Paper Settings and tap [Add] to create a new profile.
On the Detail tab, you’ll find a wealth of options:
Paper Weight settings adjust how firmly the paper is gripped and how much heat is applied. Printing on lightweight paper? Select the 16–23 lbs option to prevent wrinkles. Using thick cardstock? The 23+–28 lbs setting ensures proper toner adhesion.
Disable Duplex is a lifesaver for specialty papers that should only be printed on one side. We’ve seen many a transparency ruined by automatic two-sided printing!
You can even adjust advanced settings like fusing temperature for those finicky specialty papers that need precise heat control.
Name your custom paper type something memorable (“Holiday Cardstock” is much clearer than “Custom Type 4”), and save it.
The Sharp system can remember up to 1,000 different paper profiles—more than enough for even the most paper-diverse office. At how to change printer tray settings Sharp, it’s all about getting the right settings for your specific media.
With proper tray configuration, your Sharp printer transforms from a temperamental device into a reliable workhorse that handles everything from plain copy paper to glossy brochures without a hitch.
Advanced Options & Troubleshooting for Flawless Feeding
Ever loaded paper perfectly into your Sharp printer only to hear that dreaded grinding noise of a paper jam? You’re not alone. Beyond the basic setup, Sharp printers offer several advanced options that can transform your printing experience from frustrating to flawless.
Enabling or Disabling Auto Tray Switching
One of the most helpful features on your Sharp printer is Auto Tray Switching. This smart function allows your printer to automatically pull paper from another tray with matching paper when one tray runs empty—perfect for those large print jobs when you don’t want to stand by the machine waiting to refill trays.
How to change printer tray settings sharp devices to enable this time-saving feature:
- Access the System Settings menu
- Steer to Paper Tray Settings
- Tap [Auto Tray Switching]
- Set it to [Enable]

Here’s something many offices don’t realize: Sharp printers ship with auto tray switching turned OFF by default. You’ll need to manually enable this feature if you want uninterrupted printing. It only works between trays containing identical paper type and size—so if Tray 1 and Tray 3 both have Letter-sized plain paper, your printer will smoothly transition to Tray 3 when Tray 1 runs dry.
What to Do If the Printer Misreads Paper Size
“Why does my printer keep saying wrong paper size?” This frustrating issue often stems from a little-known fact about Sharp printers. As one technician bluntly put it: “Trays 1 and 2 of the MX3100 do NOT have auto size sensing. You have to manually set the paper size for them in the system settings.”
If your Sharp is misreading paper sizes, try these simple fixes:
Know your trays. On many Sharp models, only the optional desk unit trays (usually 3 & 4) can automatically detect paper size. The standard trays need manual configuration.
Manually set the paper size for trays without auto-sensing through your system settings menu.
Clean the sensors if auto-sensing trays are acting up. A gentle wipe with a soft, dry cloth can work wonders.
Check your printer driver settings to ensure they match what’s actually in the tray. A printer driver mismatch is often the culprit behind paper size errors.
Try the “Select Similar Sizes” option in the auto-detection settings. This gives your printer a bit more flexibility in recognizing paper dimensions.
If these steps don’t solve the problem, it might be time for a service check of the paper detection sensors.
Handling Special Media Without Jams
Nothing’s more frustrating than wasting expensive specialty paper on jams and misprints. Here’s how to get it right the first time:
For Envelopes: Load them in the bypass tray (or tray 1 if your model supports it). The key is selecting “Envelope” as the paper type and choosing the correct size. Some models even let you adjust the fusing temperature to prevent envelope sealing or wrinkling during printing.

For Labels: The bypass tray is your best friend here. Set the paper type to “Labels” and be sure to disable duplex printing—nothing creates a bigger mess than labels peeling off inside your printer during a two-sided print job!
For Glossy Stock: Select “Glossy” as your paper type and give those beautiful prints a moment to cool before handling them. This simple patience prevents smudging on your high-quality printouts.
For Heavy Cardstock: Choose the appropriate “Heavy Paper” weight range in your settings. Very thick stock works best through the bypass tray, which can handle impressive weights—up to 300 g/m² according to Sharp’s specifications.
The bypass tray is the Swiss Army knife of paper handling, supporting the widest range of media types and weights. While it might require more manual feeding, it’s worth the extra effort for those specialty projects that need to look perfect.
Best Practices to Save & Reuse Your Settings
Repeatedly setting up your paper trays can become tedious, especially in busy offices. Fortunately, Sharp printers offer several convenient ways to save your carefully configured settings for future use.
Saving Tray Presets for Regular Jobs
Your Sharp printer can remember your favorite configurations, saving you time and preventing errors. Think of these saved settings as your printer’s memory of how you like things done.
The Program Keys feature is particularly helpful for complex jobs. Once you’ve set up everything just right—from paper trays to finishing options—press the [Program] key, select an unused slot, give your setup a descriptive name (like “Marketing Brochures” or “Monthly Reports”), and tap [Store]. Next time, one button press recalls all those settings instantly.
For simpler, everyday settings, the Favorites option works beautifully. After configuring your preferences, tap [Register in Favorite] on the action panel, name your setting something memorable, and select [OK]. These favorites appear right on the main screen for quick access.
Some newer Sharp models even offer Quick Settings buttons that can be customized to appear directly on your home screen. This puts your most-used configurations literally at your fingertips when you walk up to the machine.
What makes these saved settings truly powerful is that they don’t just remember tray configurations—they can store entire job profiles including duplex settings, stapling options, color modes, and more. It’s like having a personal assistant who knows exactly how you want each document type handled.
Applying Settings from the Print Driver
While the control panel lets you save settings on the printer itself, configuring your printer driver ensures consistent results when printing from your computer.
For Windows users:
- Click Start > Settings > Devices > Printers & scanners
- Select your Sharp printer and click Manage
- Click Printing preferences
- Configure your desired settings, including paper tray selection
- Click OK to save as default, or use the Save As button to create a named preset
For Mac users:
- Choose Apple menu > System Preferences
- Click Printers & Scanners
- Select your Sharp printer
- Click Options & Supplies > Options or Driver
- Configure available options
- Click OK
The beauty of setting up your printer driver’s default settings is that they apply automatically across all your applications. Whether you’re printing from Word, Excel, or Chrome, your Sharp printer will follow your instructions consistently.
A particularly helpful feature is the Auto Configuration button found in most Sharp printer drivers. Clicking this button makes your computer automatically detect what trays and options are installed on your printer, saving you from manually entering this information.
Even when printing from mobile devices, your settings can be preserved. Sharp offers robust mobile printing solutions that maintain your preferences. Learn more about how to print from your phone to your Sharp printer without hassle.
Here at Associated Imaging Solutions, we’ve found that our clients in Philadelphia particularly appreciate the intuitive controls and memory features of Sharp copiers and printers. The ability to save and recall complex settings with a single tap transforms how teams work with documents, eliminating repetitive setup and reducing user errors significantly.
Frequently Asked Questions about How to Change Printer Tray Settings Sharp
How to Change Printer Tray Settings Sharp When Printing from a PC
When you need to print from your computer, knowing how to change printer tray settings sharp can save you time and frustration. The process is straightforward but requires attention to both your computer settings and the physical device:
- From whatever program you’re using, click File > Print
- Select your Sharp printer and click Properties or Preferences
- Steer to the Paper tab or Paper Select tab
- Choose your desired tray from the dropdown menu
- If needed, click Paper Type to specify what kind of paper you’re using
- Click OK and proceed with your printing job
The key to success here is making sure your computer and printer are speaking the same language. If your computer thinks you’re printing on letterhead but the printer tray is configured for plain paper, you might get a prompt asking you to load different paper or choose another tray. This mismatch is one of the most common causes of printing confusion.
Many office workers don’t realize that what you select in the printer driver needs to match what’s physically configured on the printer itself. Taking a moment to verify both ends can prevent those annoying mid-project paper loading requests.
How to Change Printer Tray Settings Sharp for Envelopes
Printing envelopes can be tricky, but with the right setup, your Sharp printer handles them beautifully. Here’s how to change printer tray settings sharp specifically for envelope printing:
First, load your envelopes in the bypass tray (some models also support envelope printing from Tray 1). Press the [CUSTOM SETTINGS] button on your control panel, then touch [TRAY SETTINGS] and select the bypass tray. Set the paper type to Envelope and choose the appropriate size from the list – common options include COM10, Monarch, and DL. If your envelope size isn’t listed, don’t worry – you can register a custom size. Press [OK] when you’re done to confirm your settings.
For envelope printing success, remember these friendly tips: load envelopes with the flap side down and closed, smooth them flat before loading (trapped air is the enemy of clean printing), and consider reducing print density to prevent wrinkling. While some trays can handle envelopes, the bypass tray almost always provides the most reliable feeding path.
“I spent an hour trying to figure out why my envelopes were jamming,” shares one office manager, “until I realized I hadn’t set the paper type to ‘Envelope’ in the tray settings. That one change made all the difference!”
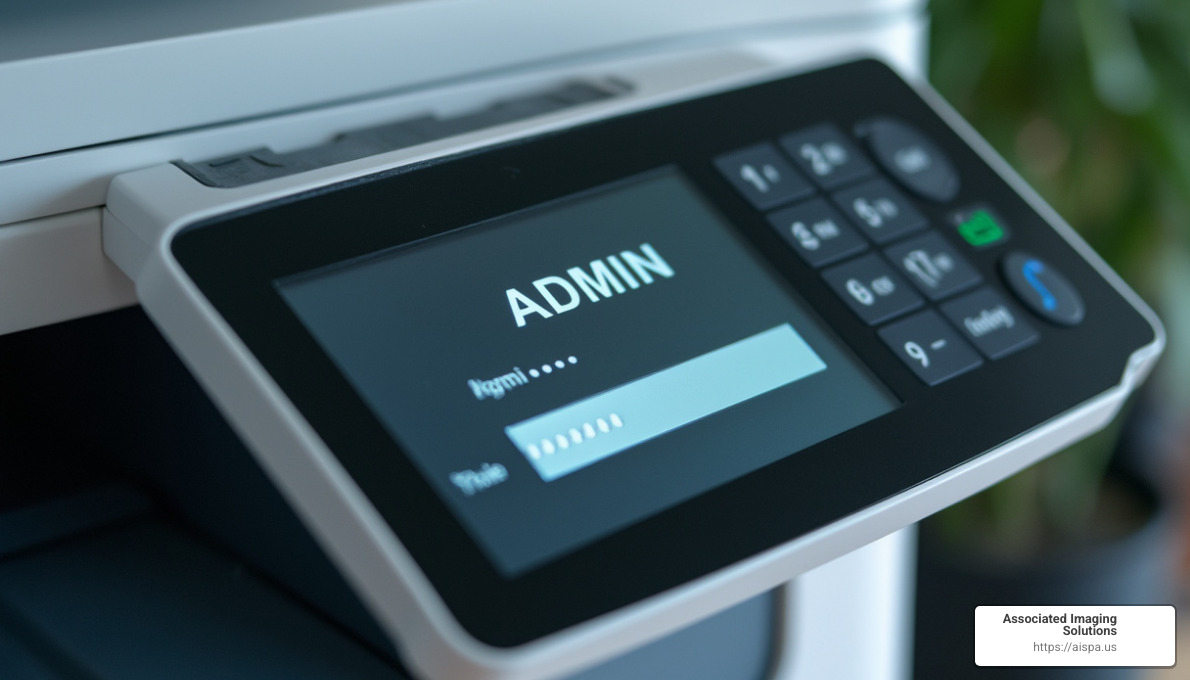
How to Change Printer Tray Settings Sharp if the Screen Is Locked
It’s frustrating when you can’t change printer tray settings sharp because the screen is locked or asking for authentication. Don’t worry – here’s what to do:
Look for an [ADMIN] or [LOGIN] button on your printer’s touchscreen. When prompted, enter the administrator password. On many Sharp models, the default password is “admin” or “00000” – though your IT department may have customized this for security reasons. Once you’re authenticated, you should be able to access all the tray settings without restrictions.
If you don’t know the password, you’ll need to contact your system administrator. They’re the gatekeepers of these settings, usually for good reason – consistent printer setup helps everyone in the office have predictable printing experiences.
Another common reason for locked settings is that the printer is busy with other work. If someone is printing a large document or the machine is processing a complex job, the settings menu might be temporarily unavailable. In this case, patience is your friend – wait until all jobs complete before trying again.
If troubleshooting doesn’t solve your problem, it might be time to bring in the experts. At Associated Imaging Solutions, we understand that printer issues can disrupt your entire workday. Sometimes a quick service call can resolve persistent issues that no amount of button-pressing will fix.
Printer security features exist to protect your settings, not to make your life difficult. A properly secured Sharp printer ensures that critical configurations stay consistent, especially in busy office environments where many people share the same device.
Conclusion
Mastering how to change printer tray settings sharp devices is actually quite straightforward once you know what you’re doing. The days of paper jams and print errors can be behind you with the proper configuration knowledge we’ve covered in this guide.
Remember these key points as you work with your Sharp printer:
First, get familiar with your specific trays. Not all trays are created equal – some have those helpful auto-sensing capabilities while others stubbornly require manual configuration. As we found earlier, Trays 1 and 2 on many Sharp models don’t automatically detect paper size, which explains a lot of common frustrations!
Always ensure your settings match reality. This might seem obvious, but it’s the number one cause of printing problems – the paper type and size settings must align with what’s actually sitting in the tray. Your printer isn’t psychic (though sometimes it seems like it’s deliberately being difficult).
Save yourself future headaches by storing your common configurations. Whether through programs, favorites, or driver presets, taking a minute to save frequently used settings can save you countless minutes of frustration later.
Don’t ignore those advanced features gathering dust. Auto tray switching is particularly valuable in busy offices where you can’t afford printing interruptions. And those custom paper profiles? They’re game-changers for specialty printing needs.
When working with special media – those finicky envelopes, sticky labels, or heavy cardstock – remember they need special attention. The right paper type setting makes all the difference between professional results and a jamming disaster.
At Associated Imaging Solutions, we’ve seen how proper printer configuration transforms office productivity for businesses throughout Philadelphia and across Pennsylvania. Our team understands the unique challenges of document management and can help you optimize your Sharp printer settings for maximum efficiency.
If you’re struggling with your current Sharp printer or wondering if it’s time for an upgrade, our copiers and printers solutions blend local expertise with cutting-edge technology. We pride ourselves on providing personalized service that truly improves your business operations.
Following the guidance in this article will help you experience fewer frustrating paper jams, achieve better print quality, and enjoy a smoother workflow with your Sharp printer. Just remember that proper tray configuration works best as part of a complete maintenance approach – regular service and timely supplies replacement complete the picture for truly optimal performance.
Related Posts
— Decode and Clear: Handling Sharp Photocopier Error Codes
— How to Download Sharp Drivers: 3 Methods That Guarantee Results