Sharp Moves for Label Printing Success

April 22, 2025
 0 views
 0 comments
How to print labels on Sharp printer is a common challenge for many office managers. If you need a quick solution, here’s how to do it:
- Load labels in bypass tray – Place labels face down in the bypass tray
- Adjust paper guides – Set guides to lightly touch the edges of your label sheets
- Configure printer settings – Select ‘Labels’ as paper type and ‘Bypass Tray’ as paper source
- Print your document – Send your print job from your computer
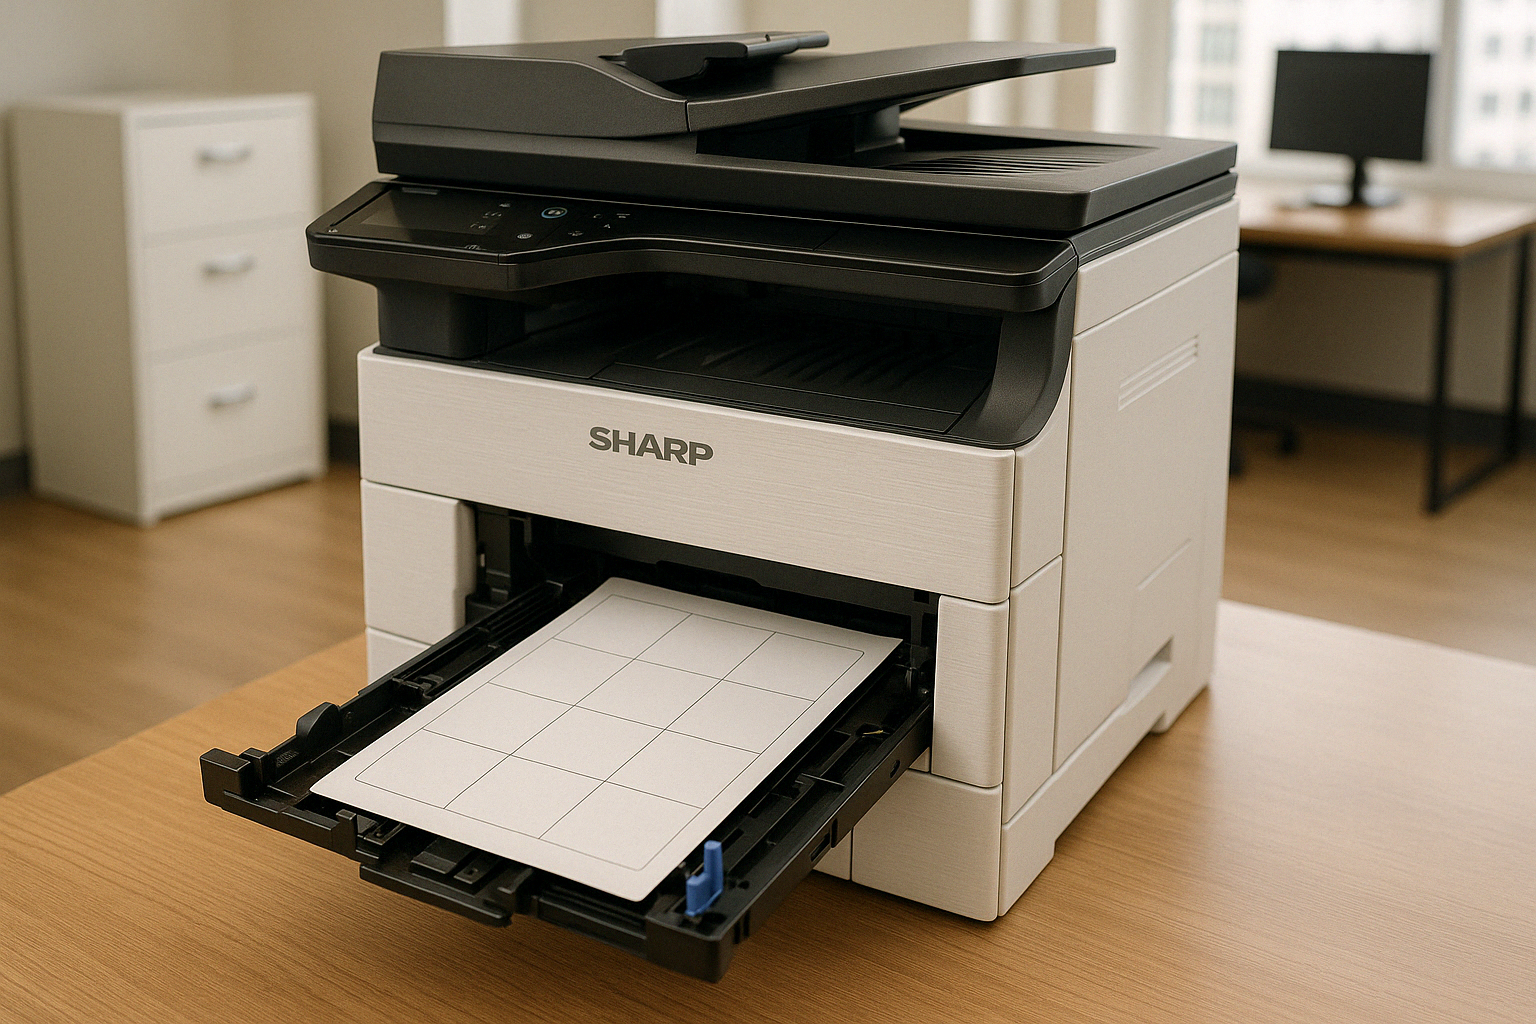
For the best results when printing labels on your Sharp printer, use the bypass tray rather than the standard paper tray. The bypass tray is specifically designed to handle specialty media like labels, envelopes, and heavy paper.
Sharp printers can handle various label types, but it’s important to use high-quality labels to prevent jams and ensure clear printing. Most standard 8½ x 11 inch label sheets work well with Sharp printers when loaded correctly.
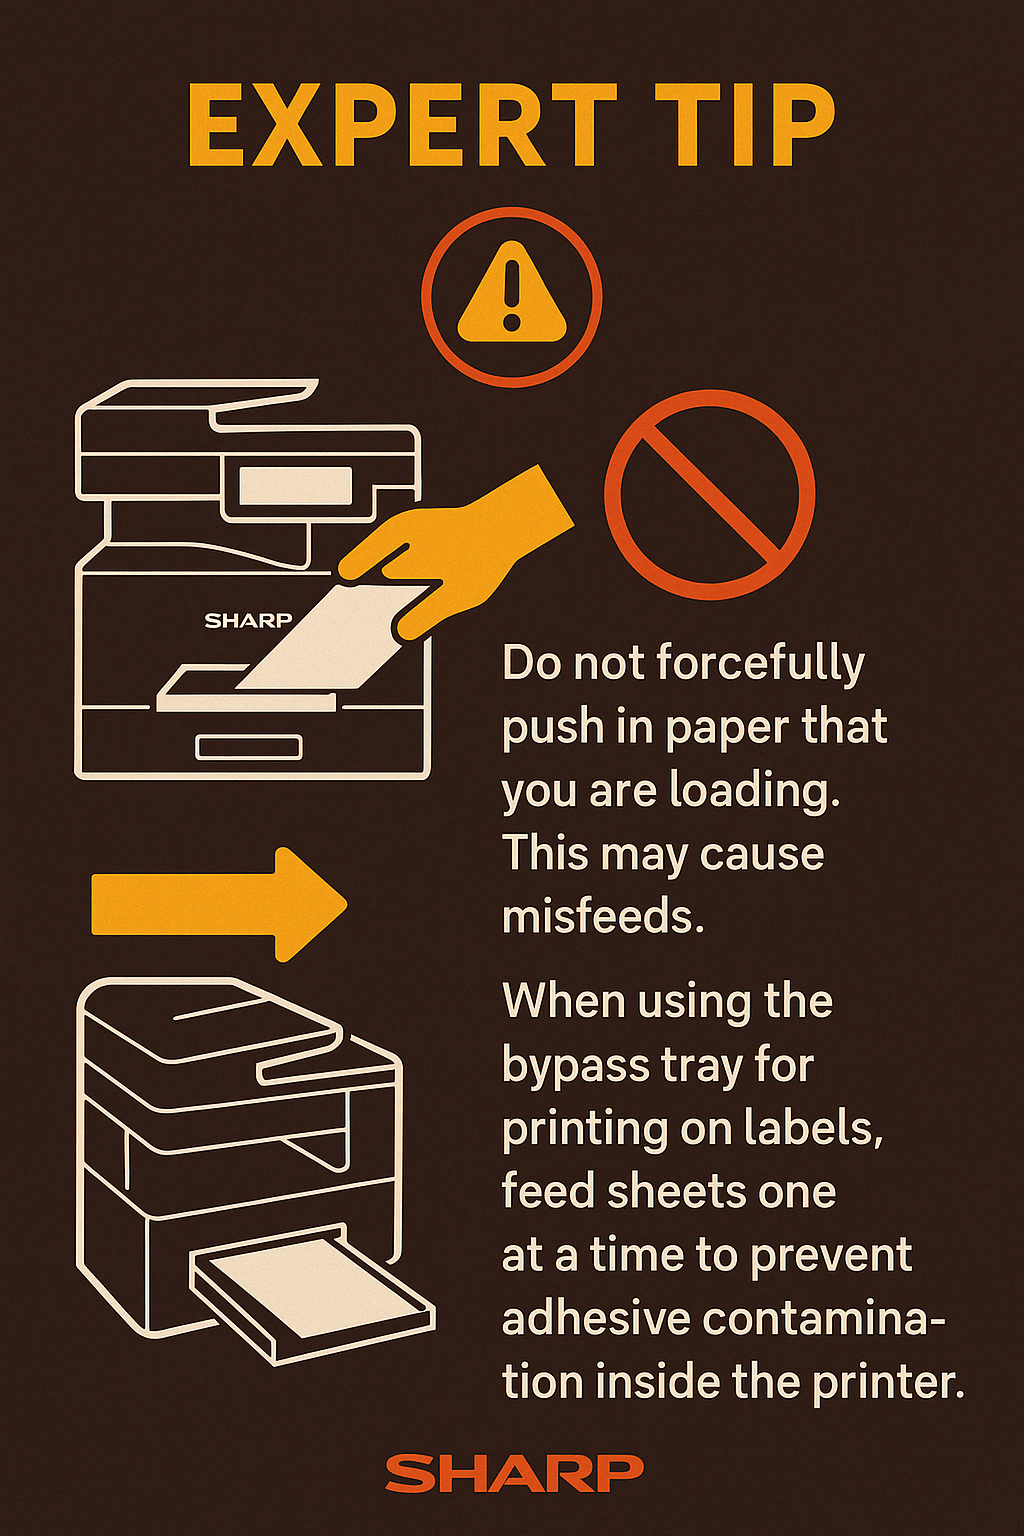
Proper loading technique is crucial. Labels should be placed face down in the bypass tray, and you should never force the paper when loading. As noted in Sharp’s documentation: “Do not forcefully push in paper that you are loading. This may cause misfeeds.”
If you’re managing an office in Philadelphia and need reliable label printing solutions, understanding these basics will help you avoid frustrating paper jams and achieve professional-looking labels every time.

How to print labels on sharp printer word roundup:
Understanding the Bypass Tray on Sharp Printers
The bypass tray is your secret weapon when it comes to printing on specialty media with your Sharp printer. This versatile feature is specifically designed to handle media that the standard paper trays can’t accommodate properly.
What Makes the Bypass Tray Special?
Think of the bypass tray as the specialty chef in your printer’s kitchen. While the main trays handle your everyday paper needs, the bypass tray steps in for those special occasions when you need something different.
The bypass tray offers a straighter paper path through your printer. Unlike the main trays that curve paper around rollers (which can crease or jam thicker media), the bypass tray provides a more direct route. This makes it perfect for labels, which need gentle handling to prevent peeling or jamming.
You’ll also notice the bypass tray has precisely adjustable guides. These let you fine-tune the fit for various media widths, ensuring your labels print correctly without shifting or skewing during the printing process.
Bypass Tray Capacity and Specifications
Your Sharp printer’s bypass tray is more capable than you might think! While it’s designed for specialty media, it can handle a surprising amount:
For regular office paper, you can load up to 100 sheets for continuous printing. When working with heavier stock (like 28 lbs. bond to 140 lbs. index), you can load about 40 sheets. For even heavier paper (140 lbs. index to 110 lbs. cover), it handles up to 20 sheets at a time.
When it comes to printing labels on your Sharp printer, the bypass tray typically accommodates about 20 sheets of labels at once – plenty for most labeling projects without requiring constant reloading.
“The bypass tray is most commonly used to print on heavier paper, labels, or envelopes, providing a unique solution for handling non-standard paper types,” explains our technical team at Associated Imaging Solutions in Philadelphia.
Paper Types Supported by the Bypass Tray
Your bypass tray is surprisingly versatile! Beyond just labels, it handles:
Plain paper for everyday printing needs. Heavy paper in various weights (from Heavy 1 at 106-176 GSM all the way up to Heavy 4 at 257-300 GSM). Of course, labels of standard sizes work beautifully. Envelopes in various sizes including DL, C4, C5, and C6 feed through nicely.
It also accommodates specialty items like tab paper for creating dividers, transparency film for presentations, and even embossed paper when you want to add texture to your printed materials.
Understanding what your bypass tray can do is like finding a hidden feature in your favorite appliance – suddenly you have many more options! This knowledge helps you make smarter choices about what label media to use and how to set up your printer for perfect results every time.
The bypass tray truly shines when printing labels on Sharp printers, giving you the flexibility to create professional-looking labels without the frustration of jams or misfeeds that often happen when trying to use the standard paper trays.
Preparing for Label Printing on Sharp Printers
Proper preparation is essential for successful label printing. Taking a few moments to prepare both your materials and printer will save you time and frustration later.

Choosing the Right Label Sheets
Let’s face it – not all label sheets are created equal. When you’re ready to tackle how to print labels on Sharp printer projects, the paper you choose makes all the difference.
Standard 8½ x 11 inch label sheets work beautifully with most Sharp printers. Look for high-quality sheets specifically designed for laser printers – they’ll resist the heat better and give you cleaner results. The adhesive matters too; laser printers generate heat that can melt poor-quality adhesives, creating a sticky mess inside your printer (trust me, you don’t want that headache!).
Before loading, give your sheets a quick inspection. Missing or damaged labels on a sheet can cause paper jams that might have you calling us for service. As our technical team at Associated Imaging Solutions often says, “Using SHARP-recommended media ensures optimal print quality and reduces the risk of printer damage.”
Preparing Your Label Sheets
Think of this as giving your labels a quick spa treatment before their big printing debut. If your label sheets have been sitting around for a while, they might have developed a slight curl. Gently bend them in the opposite direction to flatten them out – your printer will thank you.
Give your stack of labels a light fan with your thumb, just like you’re flipping through a deck of cards. This simple step prevents sheets from sticking together and causing misfeeds.
Store your unused labels in a cool, dry place. Heat and humidity can degrade the adhesive over time, and nobody wants labels that refuse to stick after printing!
Preparing Your Sharp Printer
Your printer needs a little TLC before the label printing party begins. First, remove any remaining paper from the bypass tray. This prevents accidentally printing your beautiful new labels on the wrong paper type.
Take a moment to check for debris in the bypass tray. Even tiny paper scraps or bits of adhesive residue from previous jobs can cause problems with your labels.
If you’re printing on thicker labels, you’ll need to adjust the fusing unit release levers. These little green levers inside your printer control how much pressure is applied during printing. For labels and other thick media, moving them to the lower pressure position prevents wrinkles and jams. Just remember to return them to the normal position afterward!
A word of caution – the fusing unit gets hot during printing. As Sharp’s documentation warns: “The fusing unit is hot. Take care not to burn yourself when operating the fusing unit pressure adjusting levers.” No label job is worth a burned finger!
Pre-Configuring Printer Settings
A minute spent on settings now saves headaches later. Make sure you have the latest printer driver installed for your specific Sharp model. Outdated drivers can cause all sorts of mysterious printing problems.
If you print labels frequently, consider setting the bypass tray as the default for certain applications. Even better, create and save presets with all your label settings (paper type, size, etc.) for one-click setup next time.
With your materials and printer properly prepared, you’re all set for successful label printing. The right preparation transforms how to print labels on Sharp printer from a potentially frustrating task into a smooth, professional process.
For more information about different types of paper suitable for various printing needs, check out our guide on types of paper for printing.
Step-by-Step Guide: How to Print Labels on Sharp Printer
Ready to start printing those labels? Let’s walk through the entire process of how to print labels on Sharp printer systems, from document creation all the way to finished labels in your hands.
Document Creation and Preparation
Before you even touch your printer, you’ll need to create your label document. Open your favorite software—whether that’s Microsoft Word, Adobe InDesign, or another program—and set up your label template. Take your time formatting everything just right; a little extra effort here means better-looking labels in the end. Once you’re happy with your design, save your document (we’ve all learned the hard way what happens when we forget this step!).
Accessing Printer Properties
Now comes the printing part. Click on “Print” in your program’s File menu, then select your Sharp printer from the available options. Look for a button labeled “Printer Properties,” “Preferences,” or something similar—this is where the magic happens.
Configuring Print Settings
Once you’re in the printer properties dialog box, you’ll need to make several important selections:
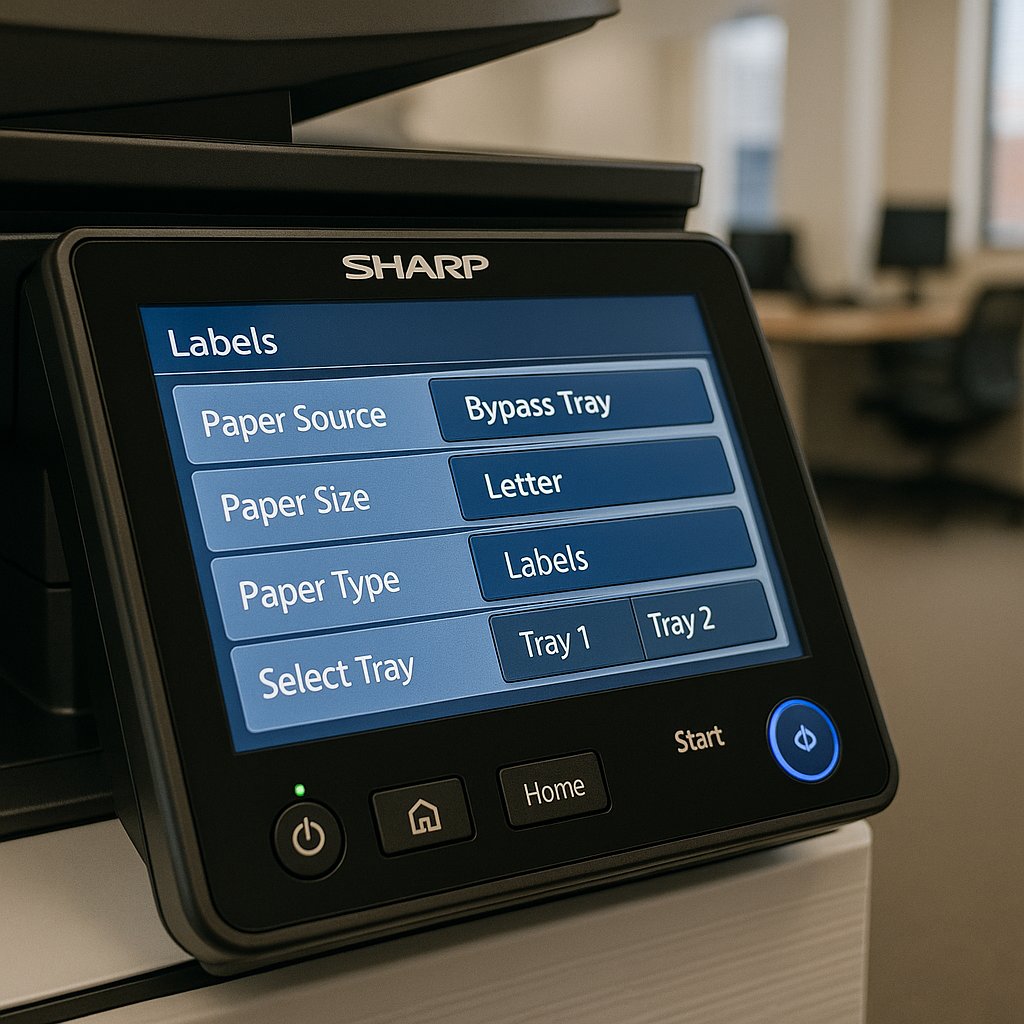
Steer to the ‘Paper Source’ tab first. Here, choose the paper size that matches your label sheets—typically 8½ x 11 inches for standard labels. Next, select “bypass tray” as your paper source. This is crucial because the bypass tray handles specialty media much better than standard trays.
Under the Paper Type dropdown, select ‘Labels’ if that option is available. If not, choose the appropriate heavy paper weight that matches your label sheets (Heavy 1 for 106-176 GSM, Heavy 2 for 177-220 GSM, and so on).
Don’t forget to set your quality preferences too. For crisp, clear labels, you might want to bump up the resolution, especially if your labels include small text or detailed graphics. Once everything looks good, click OK or Apply to save these settings.
How to Load Labels into the Bypass Tray on a Sharp Printer
Now for the physical part—loading those labels properly can make or break your printing success:
Open the bypass tray on your Sharp printer (usually it’s on the side or front). Pull out the extension guide completely if you’re using standard-sized label sheets. Adjust the paper guides so they’re slightly wider than your labels.
Place your label sheets in the bypass tray with the print side facing down. The top edge of the sheet should go in first. Gently slide the sheets all the way in until they stop—and I mean gently! As Sharp’s documentation warns, “Do not forcefully push in paper that you are loading. This may cause misfeeds.”
Once the sheets are in place, adjust the guides so they lightly touch the edges without bending them. Think of it as tucking your labels in snugly but not too tight.
Operating Copier Screen Prompts
After loading the labels, your Sharp printer’s touch screen might light up with some prompts. This is your printer’s way of double-checking what you’re doing. Confirm the paper type and size when prompted—the machine might detect the media automatically, but it’s always good to verify it shows ‘Labels’ and the correct size. If anything looks wrong, make the necessary adjustments right on the screen.
Starting the Printing Process
Now head back to your computer and click that final “Print” button to send your job to the printer. While your labels are printing, keep an eye on the process to make sure everything feeds properly. Once finished, remove your freshly printed labels promptly to prevent them from curling in the output tray.
Configuring Printer Settings for Label Printing on a Sharp Printer
Want to take your label printing to the next level? These additional settings can help optimize your results:
For text-heavy labels, look for ‘Text’ or ‘High Resolution’ mode in the print quality settings. If your labels include photos or graphics, the ‘Photo’ or ‘Graphics’ mode will give you better results.
When it comes to color, be strategic. For simple black text labels, select ‘Black and White’ to save toner. For color labels, check that ‘Color’ mode is selected and consider adjusting the color density if needed.
Important tip: Always disable ‘Duplex Printing’ when working with labels. The last thing you want is your printer trying to print on both sides of a label sheet!
If your office Sharp printer requires user authentication, don’t forget to enter your user code in the Job Handling tab. This ensures the print job actually processes rather than sitting in limbo waiting for credentials.
By taking a few minutes to properly configure these settings, you’ll save yourself the frustration of wasted label sheets and achieve professional-looking results every time. At Associated Imaging Solutions, we’ve seen how these small steps can make a big difference in the quality of your printed materials.
Troubleshooting Common Issues When Printing Labels on Sharp Printers
Let’s face it – even with perfect preparation, label printing can sometimes test your patience. The good news? Most issues have simple solutions that will get you back to printing beautiful labels in no time.
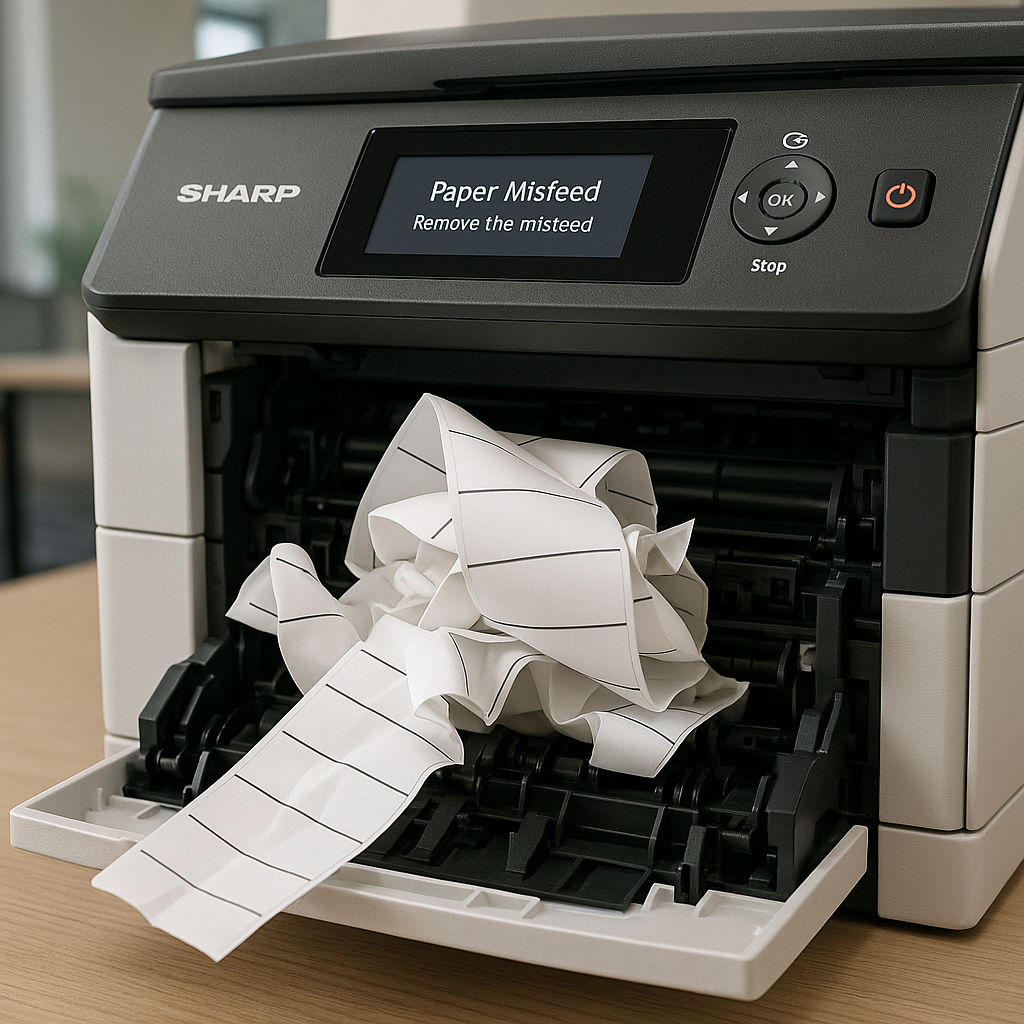
Paper Jams and Misfeeds
There’s nothing quite as frustrating as hearing that dreaded paper jam sound when you’re in the middle of an important label printing job. If your labels are getting stuck, first check the quality of your label sheets. Those pesky peeling labels can wreak havoc inside your printer.
Make sure you’re loading labels face down in the bypass tray – it’s a common mistake to put them face up. Take a moment to adjust those paper guides so they’re snug against the sheet edges without pinching them too tightly.
For particularly troublesome label stock, try loading just one sheet at a time. It takes a bit longer, but it can save you the headache of clearing a jam. And don’t forget to check those fusing unit levers – they should be in the correct position for your label thickness.
Misalignment Issues
When your carefully designed labels print off-center or at an angle, it can make your professional materials look amateur. Double-check those paper guides first – they’re often the culprit. Even small misalignments can cause big problems.
Another common issue is when your document formatting doesn’t match your actual label sheet dimensions. Before wasting expensive label stock, do a test print on plain paper first. Hold it up against your label sheet to check alignment.
Also, take a quick look at your label sheets themselves. If they’ve been sitting in a humid office or were stored improperly, they might be slightly warped, which can cause alignment problems.
Poor Print Quality
Faded text or spotty images on your labels can undermine your professional image. First, double-check that you’ve selected ‘Labels’ as the paper type in your printer settings. This tells your Sharp printer to adjust the toner application appropriately for label stock.
Low toner is another common culprit. If your Sharp printer has a toner level indicator, give it a quick check. You might also want to increase the print resolution in your printer settings for sharper text and images.
“Regular maintenance is essential for consistent label quality,” our technicians at Associated Imaging Solutions often remind clients. “Accumulated paper dust or adhesive residue can affect print quality over time.”
Curling After Printing
It’s a common sight – freshly printed labels curling up like little rolls of paper. The heat from the printing process is usually to blame. The simplest solution? Remove your labels promptly from the output tray and lay them flat.
For stubborn curling, try gently bending the sheets in the opposite direction of the curl. This can help “train” the paper to lie flat. Also, store your unused label sheets in a cool, dry place – heat and humidity are the enemies of flat labels.
Adhesive Issues
Nothing ruins a printer’s day faster than melted adhesive. If your labels are peeling off after printing or, worse, leaving sticky residue inside your printer, make sure you’re using laser-compatible labels. Regular inkjet labels can’t handle the heat of a laser printer like your Sharp.
If possible, try adjusting the fusing temperature lower. Also check those fusing unit levers – setting them to lower pressure can help with thick labels.
Printer Error Messages
When your Sharp printer starts flashing error messages, it’s trying to tell you something. If you see a paper size mismatch error, check that the size you’ve selected in the printer settings matches your actual label sheets.
Similarly, a paper type error often means you need to verify that ‘Labels’ is selected as the paper type. Sometimes the simplest solution works best – try turning the printer off, waiting 30 seconds, and turning it back on to reset any temporary glitches.
If errors persist, your printer driver might need updating. Visit the Sharp website or contact us at Associated Imaging Solutions for assistance with the latest drivers.
Preventing Future Issues
An ounce of prevention is worth a pound of cure, especially when it comes to label printing. Invest in high-quality label sheets specifically designed for laser printers – they might cost a bit more, but they’ll save you money in the long run by preventing jams and printer damage.
Store your label media properly in a cool, dry place, away from direct sunlight. Take a moment to clean the bypass tray regularly to remove any adhesive residue that might build up over time.
One tip our Philadelphia clients love: create and save print presets for your commonly used label formats. This saves time and reduces the chance of incorrect settings.
Most importantly, make sure everyone in your office who uses the printer knows the proper how to print labels on Sharp printer techniques. A little training goes a long way toward preventing frustrating (and potentially costly) mistakes.
Here at Associated Imaging Solutions, we’ve found that most label printing issues can be resolved with proper media selection, correct loading techniques, and appropriate printer settings. If you continue to experience problems with your Sharp printer in the Philadelphia area, our friendly technicians are just a phone call away, ready to provide hands-on assistance to get your labels looking perfect again.
Maintenance Tips for Optimizing Label Printing on Sharp Printers
Taking care of your Sharp printer isn’t just about fixing problems when they happen—it’s about preventing issues before they start. With some simple, regular maintenance, you’ll keep your label printing running smoothly for years to come.
Regular Cleaning Procedures
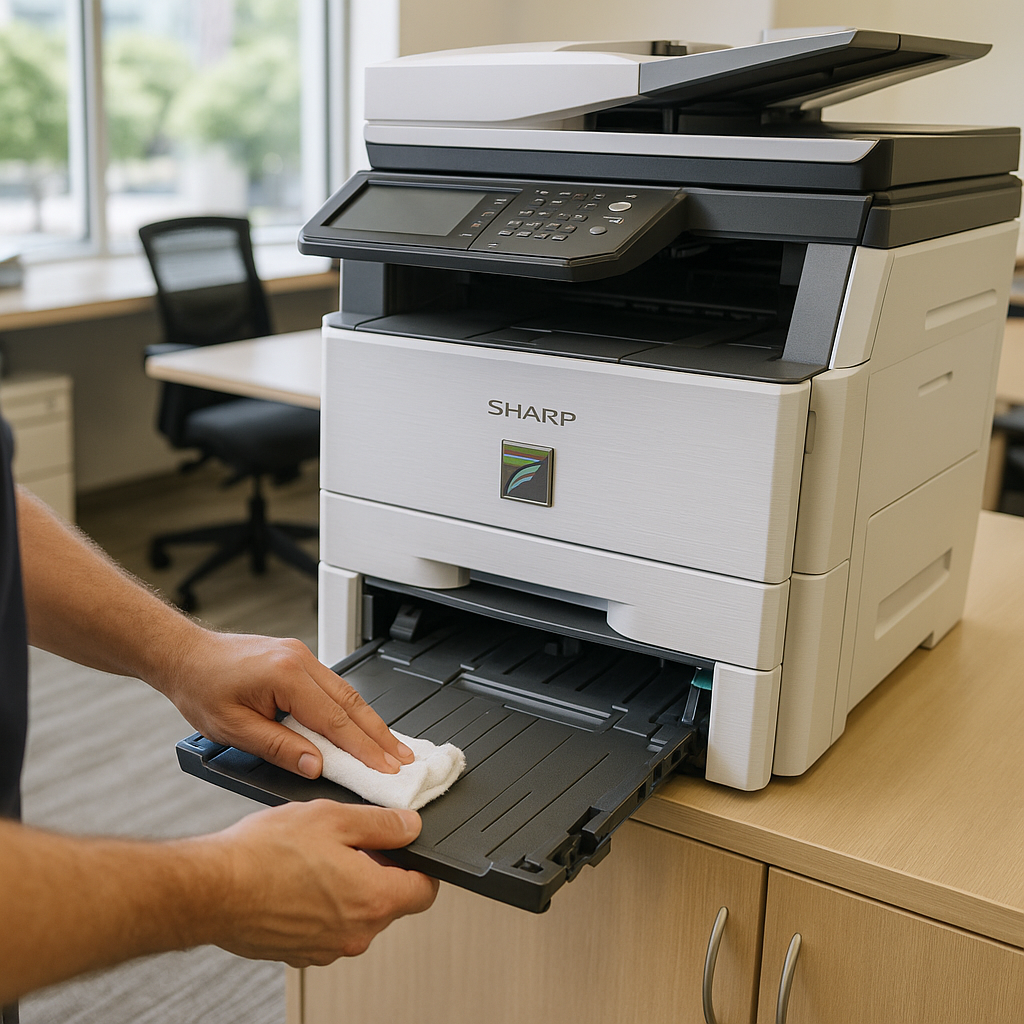
Your bypass tray deserves some TLC, especially after printing sticky labels. Start by powering off and unplugging your printer (safety first!). Grab a lint-free cloth, dampen it slightly with water, and gently wipe down the bypass tray. Pay extra attention to those paper guides and feed rollers—they’re the parts that touch your labels directly.
Notice any sticky residue from label sheets? That’s normal but needs addressing. A cotton swab with a bit of isopropyl alcohol works wonders for removing adhesive without damaging your printer. Just be gentle—your printer is tough, but harsh chemicals can damage its plastic components.
“I always tell our Philadelphia clients to check their paper path regularly,” says our service team at Associated Imaging Solutions. “Paper dust builds up faster than you’d think, especially when printing on specialty media like labels.” A quick blast of compressed air (on low pressure) can clear out dust from those hard-to-reach spots.
Preventive Maintenance Schedule
For our Philadelphia business customers who print labels regularly, we recommend a simple maintenance rhythm:
Daily habits make a big difference—just take a moment to check for and remove any paper dust or adhesive residue after your label printing sessions. Think of it like wiping down your kitchen counter after cooking.
Weekly attention to your bypass tray and paper guides keeps things running smoothly. A quick wipe-down takes just a minute but prevents buildup that can cause misfeeds.
Monthly care should include a more thorough cleaning of feed rollers and the paper path. It’s like giving your printer a mini spa day.
Quarterly checkups with one of our professional technicians can catch and address wear-and-tear before it becomes a problem. We can spot the early warning signs that most users miss.
Fusing Unit Maintenance
The fusing unit—that part that melts the toner onto your labels—needs special consideration. Those green levers aren’t just decorative; they’re crucial for proper label printing.
Always adjust the fusing unit release levers to the “label position” when printing on sticky media. This reduces pressure and heat, preventing label adhesive from melting inside your printer (a costly problem to fix!).
Just as important: return those levers to normal position when you’re done with labels. As Sharp’s documentation emphatically states: “Be sure to return the levers to the ‘normal pressure position’ before printing or copying on paper other than envelopes.”
Your printer also appreciates cool-down breaks between large label jobs. Printing hundreds of labels non-stop can overheat components, so give your hardworking machine short breaks during marathon printing sessions.
Toner Considerations for Label Printing
Label designs typically use more toner than regular documents—all those bold borders, logos, and text need plenty of toner to look crisp and professional. Keep a closer eye on toner levels when you’re printing lots of labels, and always have replacement cartridges on hand.
If your labels start looking faded, try this quick fix: remove the toner cartridge and gently rock it horizontally (don’t shake vigorously). This redistributes the toner inside and might give you enough print quality to finish your current job before replacing the cartridge.
Component Inspection and Replacement
The paper guides in your bypass tray will eventually show signs of wear—they might become less springy or develop rough edges. These seemingly minor issues can cause major headaches with label printing. Check these guides periodically and consider replacement if they’re not functioning properly.
Pay attention to early warning signs: if your printer suddenly becomes finicky about feeding label sheets, your pick-up rollers might be wearing out. Streaky or spotty printing often points to issues with the drum unit. Addressing these symptoms early saves both time and money.
Software and Firmware Updates
Your printer’s brain needs updates too! Check regularly for driver updates on Sharp’s website or contact us at Associated Imaging Solutions for assistance. Updated drivers often include improvements specifically for handling specialty media like labels.
Firmware updates might seem like a technical hassle, but they’re worth the effort. They can fix bugs, improve performance, and sometimes even add new features that make how to print labels on Sharp printer systems easier and more reliable.
By following these simple maintenance practices, you’ll keep your Sharp printer humming along happily, producing beautiful, professional labels without interruption. And remember, if you’re in Philadelphia and need more hands-on help with your printer maintenance, our team at Associated Imaging Solutions is just a phone call away.
Frequently Asked Questions About Printing Labels on Sharp Printers
We’ve compiled answers to the most common questions our customers in Philadelphia and across Pennsylvania ask about printing labels on Sharp printers.
What Types of Label Sheets are Compatible with Sharp Printers?
When it comes to choosing the right labels for your Sharp printer, not all options will deliver the same results. Most Sharp printers work beautifully with standard 8½ x 11 inch letter-size label sheets – these are your safest bet for trouble-free printing.
One crucial distinction to remember: always use laser-compatible labels specifically. Inkjet labels might seem similar, but they’re designed differently and can actually melt inside your Sharp printer, potentially causing expensive damage. The adhesive on laser labels is formulated to withstand the high heat of the fusing process.
Weight matters too – most labels fall into either the Heavy 1 (106-176 GSM) or Heavy 2 (177-220 GSM) categories. Your specific Sharp model’s manual will indicate the maximum weights it can handle, so it’s worth taking a quick peek before purchasing.
While Sharp doesn’t officially endorse specific brands, our technicians at Associated Imaging Solutions have seen consistently good results with labels from Avery, 3M, and other major manufacturers. These companies design their laser labels to withstand the heat and pressure inside your Sharp printer.
For those unique projects requiring special shapes or sizes, we recommend testing a single sheet first before committing to a full print run. This simple step can save you both frustration and potential printer issues.
As our technical team often reminds customers: “Using SHARP-recommended media ensures optimal print quality and reduces the risk of printer damage.”
How Can I Prevent Misfeeds When Printing Labels?
Label misfeeds can quickly turn a simple printing task into a frustrating experience. Fortunately, a few thoughtful steps can dramatically reduce these problems.
Proper loading technique makes all the difference. Always place your labels face down in the bypass tray, gently sliding them in until they naturally stop – forcing them further only invites trouble. The paper guides should be adjusted to lightly touch the edges without creating any bend or curl in the sheets.
Before loading, take a moment to fan the sheets between your fingers. This simple gesture separates any sheets that might be sticking together due to static electricity. If you notice any curled edges, gently bend them in the opposite direction to flatten them out. A quick inspection for any peeling or damaged labels can prevent a potential jam before it happens.
For particularly thick or troublesome label stock, consider the one-at-a-time method. While it takes a bit longer, feeding individual sheets can prevent the frustration of clearing jams and potentially wasting expensive label stock.
Your printer settings play a major role too. Always select ‘Labels’ as the paper type and ensure the bypass tray is selected as the paper source. These settings adjust how the printer handles the paper and the temperature it uses for fusing the toner.
Environmental factors matter more than you might think. Store your label sheets in a cool, dry place to prevent humidity from affecting the adhesive or causing curling. Labels that have been exposed to humid conditions are much more likely to cause feeding problems.
Are There Maintenance Tips for the Bypass Tray When Printing Labels Frequently?
If you’re regularly printing labels on your Sharp printer, giving your bypass tray some extra TLC will keep things running smoothly.
Weekly cleaning becomes important when labels are a regular part of your printing routine. Power down your printer first, then use a lint-free cloth slightly dampened with water to wipe down the bypass tray surfaces. Pay special attention to the paper guides and feed rollers, where paper dust and tiny label fragments tend to accumulate.
The invisible enemy of label printing is adhesive residue that can transfer to your printer’s components. Check regularly for any sticky spots on rollers and guides. If you find some, a cotton swab lightly dampened with isopropyl alcohol works wonders for gentle removal. Just be careful to avoid harsh chemicals that could damage plastic parts.
Don’t overlook the paper guides – these need to move freely and lock firmly in position. If they’re sticking or not holding properly, your labels won’t feed correctly. Regular inspection can catch wear or damage before it affects your printing.
A smart preventive measure after a label printing session is to run a few sheets of regular paper through the bypass tray. This helps clean the rollers of any adhesive or paper dust that might have accumulated during your label run. If you print labels daily, consider scheduling more frequent professional maintenance checks.
Regularly inspect the pick-up roller for signs of wear, glazing, or paper dust buildup. This small component plays a huge role in properly feeding your labels, and its condition directly impacts your printing success.
Can I Print Full-Sheet Labels on a Sharp Printer?
Yes, your Sharp printer can handle full-sheet labels, but they do require a bit more care than standard label sheets.
Full-sheet labels expose more adhesive to the printer’s heat, increasing the risk of melting. For this reason, high-quality laser-compatible full-sheet labels are absolutely essential. Cutting corners on quality here can lead to adhesive oozing inside your printer – a costly mistake.
If your Sharp model has fusing unit release levers, consider adjusting them to the lower pressure position when printing full-sheet labels. This reduces the pressure and helps prevent adhesive from being squeezed out at the edges.
In your printer settings, select either ‘Heavy Paper’ or ‘Labels’ as the paper type. Some advanced models allow you to reduce the fusing temperature slightly, which can be helpful for full-sheet labels.
Once printed, immediately remove full-sheet labels from the output tray. The residual heat can cause curling if they sit too long, making them difficult to apply neatly to your intended surface.
How Do I Handle Custom-Sized Label Sheets?
When your project calls for non-standard label sizes, a bit of extra preparation ensures success.
First, check your Sharp model’s specifications to verify compatibility with your custom size. Not all printers can handle every possible dimension, especially very small or very large sheets.
Most Sharp printers allow you to create custom paper sizes in the printer properties. Look for this option, enter the exact dimensions of your label sheet, and save it with a descriptive name that you’ll recognize for future use.
Before printing on your actual labels, create a proper template in your design software that precisely matches the layout of your custom labels. Test the alignment by printing on plain paper first, then holding it up against your label sheet to check that everything lines up perfectly.
Pay attention to the correct feeding orientation – whether your custom labels should be fed short-edge or long-edge first can make a big difference in proper alignment. Adjust the bypass tray guides to match this orientation.
By following these guidelines, you’ll be well on your way to successfully printing professional-looking labels on your Sharp printer. If you encounter persistent problems with your Sharp printer in the Philadelphia area, our team at Associated Imaging Solutions is always ready to help with expert advice and service custom to your specific needs.
Conclusion
Printing labels doesn’t have to feel like rocket science – even with a Sharp printer! Throughout this guide, we’ve walked through the steps to help you create professional-looking labels without the frustration of paper jams or misprints.
Let’s take a moment to refresh what we’ve learned about how to print labels on Sharp printer systems:
The bypass tray is your best friend when it comes to label printing. This special tray provides the optimal path for specialty media like labels, helping you avoid those annoying paper jams that can waste both time and materials.
Quality matters when selecting your labels. Always opt for laser-compatible label sheets that can handle the heat of your Sharp printer without melting or peeling. Think of it as choosing the right tool for the job – using inkjet labels in a laser printer is like using a hammer to insert a screw!
A little preparation goes a long way. Taking those extra moments to straighten curled sheets, fan your stack of labels, and ensure your printer is clean can save you from headaches later. It’s like checking your ingredients before cooking – a small step that makes a big difference in the end result.
Settings make or break your printing job. Always select ‘Labels’ as the paper type and ‘Bypass Tray’ as the paper source in your printer settings. These simple selections tell your printer exactly how to handle this special media.
Proper loading technique prevents most common problems. Remember to place labels face down in the bypass tray and adjust those guides so they gently touch the edges without creating any bending or warping.
Regular maintenance keeps your printer happy and healthy. Just like your car needs oil changes, your printer needs regular cleaning – especially when printing sticky labels that can leave residue behind.
At Associated Imaging Solutions, we’ve helped countless businesses across Philadelphia and Pennsylvania streamline their document management processes. We understand that whether you’re printing shipping labels for your Pittsburgh e-commerce shop, product labels for your Harrisburg retail store, or address labels for your Philadelphia marketing campaign, you need reliable results every time.
Think of your printer maintenance and supplies as investments rather than expenses. Quality materials and proper care extend your printer’s life and reduce those frustrating moments when you need to print something urgently but encounter problems.
If you find yourself struggling with persistent issues despite following these guidelines, our technicians at Associated Imaging Solutions are just a phone call away. We’re real people who understand your printing challenges and can provide hands-on support when you need it most.
For more information about our copiers, printers, and managed print services, visit our page on copiers and printers.
By mastering these “Sharp moves” for label printing, you’ll save valuable time, reduce waste, and produce professional-quality labels that make your business communications shine. After all, those little sticky papers carry your brand’s impression – they deserve to look their best!
Related Posts
— Decode and Clear: Handling Sharp Photocopier Error Codes
— How to Download Sharp Drivers: 3 Methods That Guarantee Results